Nowadays, the majority of people prefer to make most of their purchases online. If you need to sell a product or service, a WordPress payment form offers a straightforward way to start selling online and meet your customers where they want to be.
Many times, installing and customizing a shopping cart for your WordPress website can be an unnecessary hassle. Especially if you’re a small business or just starting out with your blog and want to set up your e-shop later.
That’s where Gravity Forms comes into play. Gravity Forms helps you create a WordPress payment form. A place where shoppers can choose products or services and make a payment right through the form. This without the need for WooCommerce or another eCommerce platform.
In this post, you’ll learn step-by-step how to create your own online payment form with WordPress and Gravity Forms.
But first, why a WordPress payment form? Let’s talk about the benefits in more detail…
How Can Using an Online Payment Form Benefit Your Business?
Forms are one of the most versatile online tools. Actually, a form might be the simplest way to sell your products or services online.
Payment forms have two main tasks:
- To gather all the necessary information about the customer and their purchase.
- To accept payments.
If you want to create a WordPress payment form, using a dedicated form plugin makes a lot of sense because…
- Implementing the forms within your website doesn’t require advanced development skills.
- All the credit card data and other sensitive information are stored outside of your website by a third party which makes it secure.
- Having a payment form on your WordPress can greatly help you if you have many different options for a product or a complex order process.
- Through customization, these forms can accept recurring payments or subscriptions.
- The forms are easy to use by the customers, therefore increasing customer satisfaction and decreasing the possibility of them abandoning the form mid-process.
If you just want a contact form on your website, so that users can easily get in touch with you, there’s a wide range of contact form plugin choices.
However, when it comes to payments, if we were to recommend an online form builder plugin for WordPress, we would suggest you choose Gravity Forms. We have successfully used it in the implementation of one of our projects. For example Askademic.com – an online platform that connects teachers to students and focuses on helping students with their homework.
So, the way we’ve done it was that for the homework request form, we have customized the Gravity Forms plugin and the same tool was also used for online payment integration along with WooCommerce add-ons for Stripe and Paypal payment systems.
If you want to learn more about this case study, you can check it out here.
What Payment Gateways Integrations Do Gravity Forms Support?

With Gravity Forms and the right payment gateway, you can create a simple WordPress payment form to process your own transactions online. Gravity Forms integrates with some of the most popular payment processors on the web and it supports their integration via its webhooks and API.
Here are the main payment gateways/ add-ons you can choose from:
- PayPal Payments Standard (available with Pro and Elite license) – provides users with seamless integration, simple and fast setup for your one-time transactions, recurring payments, and subscriptions. You can also accept PayPal donations with the Gravity Forms donation field.
- PayPal Payments Pro (available only with Elite license) – has similar features as the Standard version but it is used with a PayPal Pro account.
- 2Checkout – supports a large number of payment locations worldwide (over 200 countries), meaning that people across the globe can now accept payments inside their WordPress forms. It accepts single and multi-product payments and also subscription payments provide support for over 45 payment methods and in over 100 different currencies.
- Authorize.net – used with an Authorize.Net account, you can register credit card payments together with any additional data you need from your customers directly on your website, without sending them to a 3rd party to complete the transaction.
- Stripe – the latest version of the Stripe add-on includes new methods for collecting payment information (Stripe Credit Card Field and Stripe Payment Form), enhanced security with easy PCI compliance, and allows users to apply custom branding to their checkout forms.
If you want an in-depth comparison of the top payment gateways, check out this article.
Once you decide which add-on works best for your business needs, the next step is to set it up. 👇
How to Create a WordPress Payment Form With Gravity Forms
Once you’ve chosen your payment processor, you should follow the following steps to set up your payment gateway:
Install Gravity Forms If You Haven’t Already
You can read the Getting Started Guide if you need help with Gravity Forms or this guide about installing WordPress plugins.
Install the Appropriate Add-on for Your Payment Processor
Gravity Forms has extensive and useful documentation that can help you with the setting up process of the payment add-on you selected.
You can install add-ons just like you would any other WordPress plugin.
Create a New Form for Four Transaction
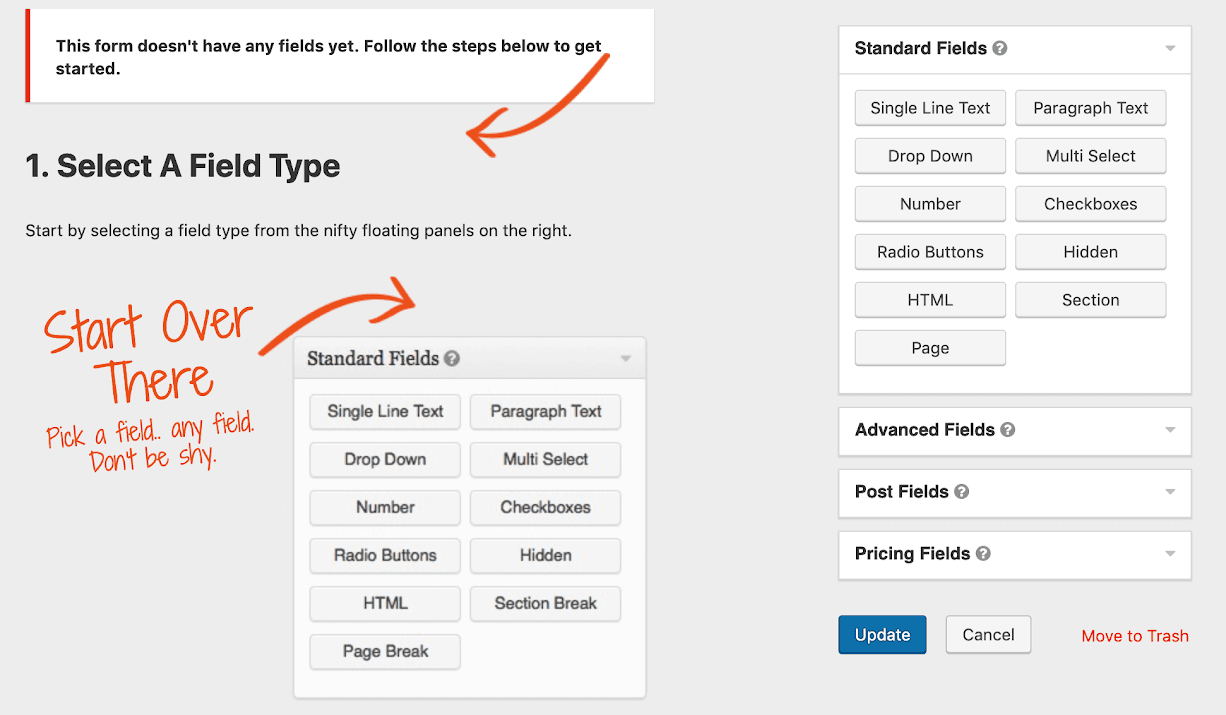
You can do this by clicking New Form under Forms on the left side of your dashboard.
When it comes to best practices to create a successful payment form, here are a few Gravity Forms approved tips that will help you out:
- offer free shipping (many customers are discouraged when they see a high shipping fee after they selected their desired products)
- make sure to show the customer’s progress throughout the buying process
(within the form you can show the customer how many steps are left until the check out)
- offer more than one payment option on your form (your customers might have a preferred payment processor they trust and want to use)
- use form fields that ask for the relevant and necessary information to complete the transaction (if there are too many fields, the customer will feel trapped in a labyrinth and might abandon the form/ transaction)
You can find out more tips for high converting payment forms here (PDF).
Create the Necessary Form Fields for Your Transaction
The main form fields that you must add are contact fields including…
- Name
- Address
- Phone Number
You’ll also need product fields to control what items people can purchase and how much each item costs.
To set this up, you can use the Option and Quantity fields to add more information about the products and their prices.
Finally, to process payments and shipping (for physical products), you’ll want to use these three fields:
- Credit card field
- Total field
- Shipping field
Create a Feed for Your Form to Send the Billing Data to Your Payment Processor
A “feed” lets you connect your WordPress payment form to the payment processor so that you can process payments. This is the payment processor you chose in Step #2.
You can set up a feed by hovering over Settings and clicking on your add-on. Here‘s an example for setting up a feed for the PayPal Payments add-on that will help you out.
Add the Payment Form to Your Website (and Don’t Forget to Test It)
There are various ways of adding a form to your WordPress page and you can check them out here. Also, in order to make sure that the form works when your customers access it, you can complete a transaction with it by making a purchase with a credit card, basically from yourself.
In the end, it should look like this:

Now, let’s have a look at how you can apply all of the above practically speaking. 👇
How to Use a Custom Payment Workflow With Gravity Forms
In the case of Askademic, the e-learning platform we have mentioned before, we have integrated Stripe Connect with Gravity Forms. What this platform does is to enable students to contract teachers who can help them with their homework.
Based on the service type (academic writing, creative writing, etc.), the deadline date, the academic level (high school, college, etc.), and the number of pages in the homework, the WordPress payment form automatically calculates the project pricing. The tighter the deadline, the higher the price.
See the form on the page:

And here’s how the payment process on Askademic works:
- The student pays for help with their homework using Stripe Connect. Once this is done, Stripe puts a hold for the amount on the student’s card.
- The teacher delivers the homework that fulfills the student’s requirements.
- When the homework is confirmed by the student, Stripe Connect splits the amount like this: (I) One part will go to the teacher, for the service performed. (II) One part will go to the Askademic platform, as a platform fee. (III) One part will be retained by Stripe as a payment processing fee.
The payment can be made via PayPal as well. But in this case, the full amount will be paid to Askademic’s Paypal account. Then the sum of money will be manually split by the Askademic admins. Formerly, Paypal used to offer PayPal adaptive payments, however, this service is not available anymore to new businesses.
Conclusion
Gravity Forms can be a great alternative for small businesses that don’t want to implement a full e-commerce solution for their website.
A WordPress payment form helps you to create a simplified and user-friendly custom payment solution. One that can deliver a high number of successful transactions and happy customers.
Finally, while a secure third-party will handle processing your payments, you’ll still want to implement these eCommerce security best practices to go along with your payment form and you’ll definitely want to make sure your WordPress site is using HTTPS.

![Why [and When] Should You Choose WordPress Why [and When] Should You Choose WordPress - WPRiders Article](https://wpriders.com/wp-content/uploads/2024/09/image3-1.jpg)


